DeFi Saver Automation performance analysis — Setting up for maximum profits
An analysis of Automation configurations to help you make the best possible results.
Automation is a unique system available t DeFi Saver that provides trustless management of collateralized debt positions in MakerDAO, with support for additional decentralized finance protocols coming soon.
Initially introduced in September 2019, the system has continuously grown and currently manages around 70,000 ETH (with a peak of 85,000 ETH), 26 WBTC and 380,000 BAT in over 360 unique positions. Although it was originally imagined solely as a system for liquidation protection, we quickly realized just how popular it was among users to Boost whenever ETH moved up and so the decision was made — Automation will work both ways.
For some, however, automatic Boosting is an unwanted feature, with their reasoning being that it buys ETH when it spikes in price, only to potentially sell it off again when it drops back down later — buying high and selling low, in a true ETH trader fashion. But these users seem to be a minority, since only ~18% of automated positions have automatic Boosting disabled.
Why would anyone want automatic Boosting enabled, what’s the idea behind this? Well, in case of a massive continued appreciation of ETH value (a bull run, if you will), you would be able to obtain additional chunks of ETH for your CDP, which would consequently be worth continuously more as the market kept moving up.
Let’s take a look at an example of using MakerDAO to leverage ETH. If you have 10 ETH and you open a CDP with ETH at $200, you can generate 1000 DAI and use it to have 5 ETH more added to your CDP. You can do this in a single transaction using Boost. If ETH later reaches $500, you could pay back the 1000 DAI debt with 2 ETH and walk away with 13 ETH where you initially had 10.
Now, if you set up Automation for that CDP, the system can keep adding more ETH as it goes up towards the suggested $500 price. It would generate more DAI to obtain more ETH at $240, $280, etc, depending on your configuration. But the continued incremental leveraging would allow you to further increase gains.
Ultimately, then, for most Automation users, the only question is: How to maximize profits?
Taking a look at current Automation configurations
At the time of writing, there are ~360 positions managed by DeFi Saver Automation. Some 65 of those have automated Boosting disabled and for the sake of the goal of this article we will disregard those.
If we look at all positions with automated Boosting enabled, the mean average configuration is set to boost if the ratio goes above 4800% and increase leverage down to 450%. Okay, this seems to involve some very optimistic if not impossible ratios, so let’s try some different math.
Looking at a median average of all automated Boosting configurations, we get a much more meaningful insight — the median config is set to boost if the ratio goes above 240% and increase leverage down to a 220% collateralization ratio.
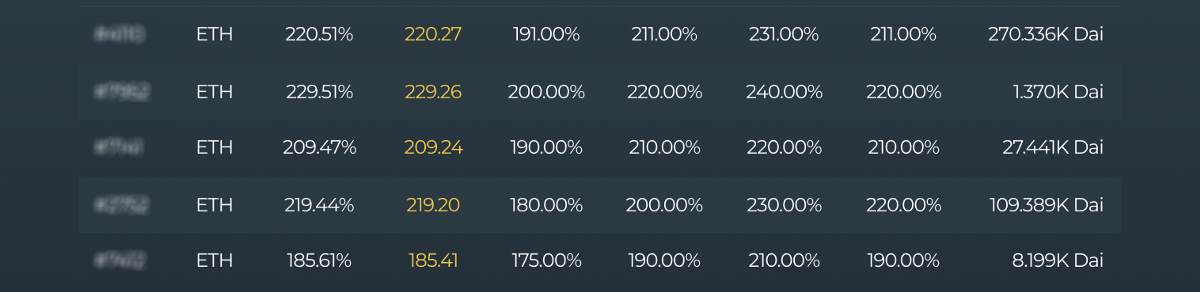
How about if we filter it to just positions with some weight, let’s say over 1k DAI debt? The median average configuration remains the same — boost from 240% to 220%. Filtering to positions with 2k+shows the exact same thing.
But if we look at positions with 5k+ DAI debt then things change a little: the median average configuration for automated boosting changes to 235% to 215%, meaning slightly more aggressive.
We should mention that the 240% -> 220% auto-boost has also been the default recommended setting for the past two months (since Black Thursday), where it was previously 220% -> 200%. Is the average setting we’re seeing heavily influenced by this, then?
Well, the recommended auto-repay setting for the past two months has been 200%->220%, but both mean and median averages show lower values than this used by users, with the median being 180%->200%. This indicates that a great number of users does in fact customize their settings.
Is this configuration (Repay from 180% to 200%; Boost from 240% to 220%) then the ultimate setup, produced by the hive mind of Automation users?
Let’s test.
Experimenting with different Automation setups
For further analysis of how different settings perform we’ll be using the Simulation tool available at DeFi Explore. The average automated position size right now is ~200 ETH, so we’ll be using that as the starting point for all simulations.
The ETH bull run case
For starters, we’ll be looking at what we believe would be everyone’s preferred development — a constant and continued appreciation of ETH’s market price, in this case straight to $500.
We’ll set the benchmark using the currently recommended, default configuration at DeFi Saver: Boost from 240% to 220%. The auto-repay thresholds won’t matter too much in this scenario.
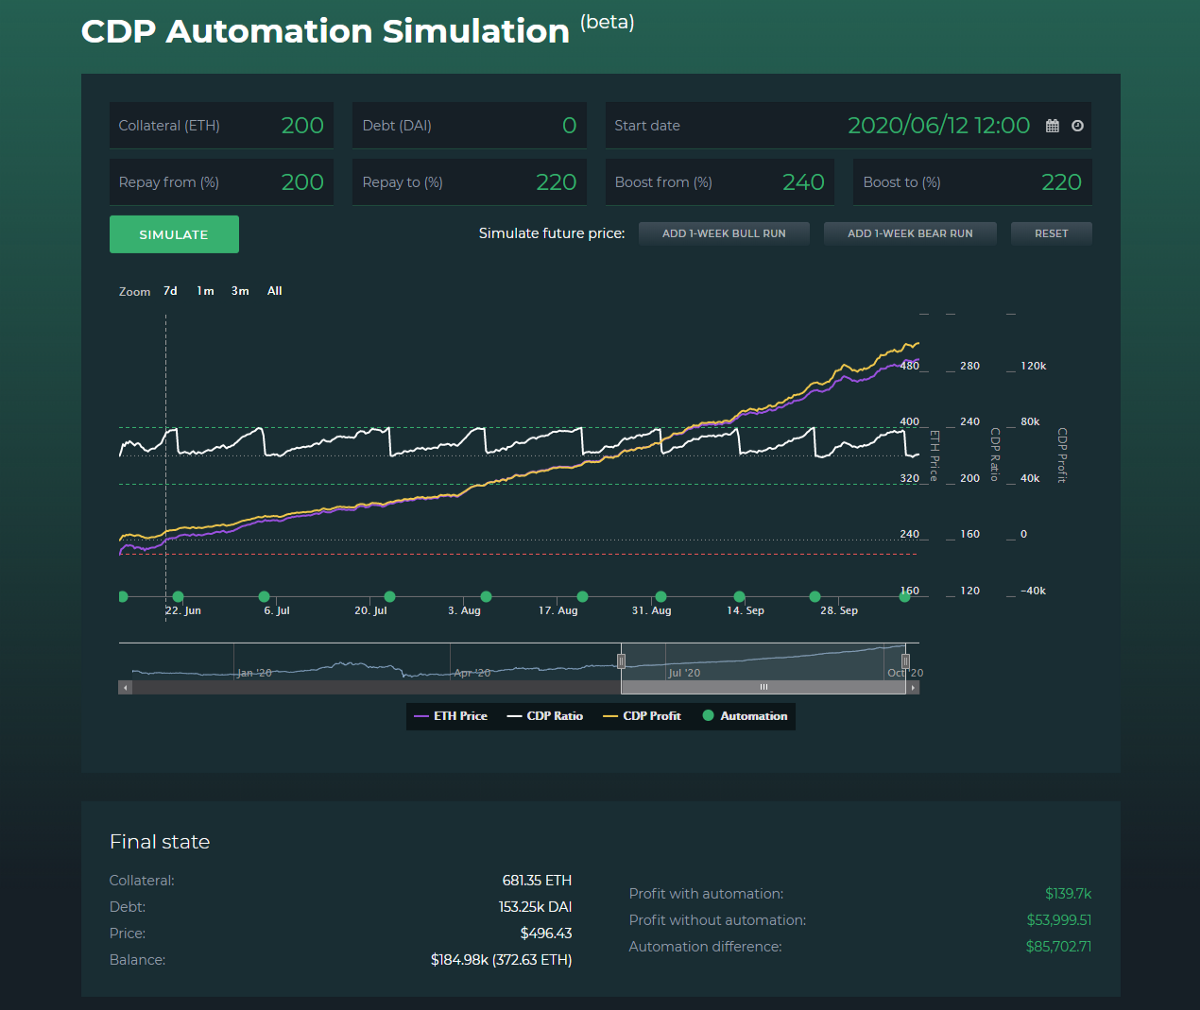
This is already looking great, with Automated Boosting allowing an increase of ETH by+86% to 372 from the starting 200 ETH.
Remember, if you’re using MakerDAO to leverage ETH and therefore don’t keep DAI for debt payback, you can always use the “Close CDP” option in our MakerDAO dashboard which will close your position in 1 transaction, paying back all debt with the collateral within and withdrawing the remaining collateral to your account.
Since we noticed that those larger CDPs lean towards a slightly tighter, more aggressive configuration, let’s look at what happens when we apply Automated Boosting at 220% to 200% over the exact same simulated market.
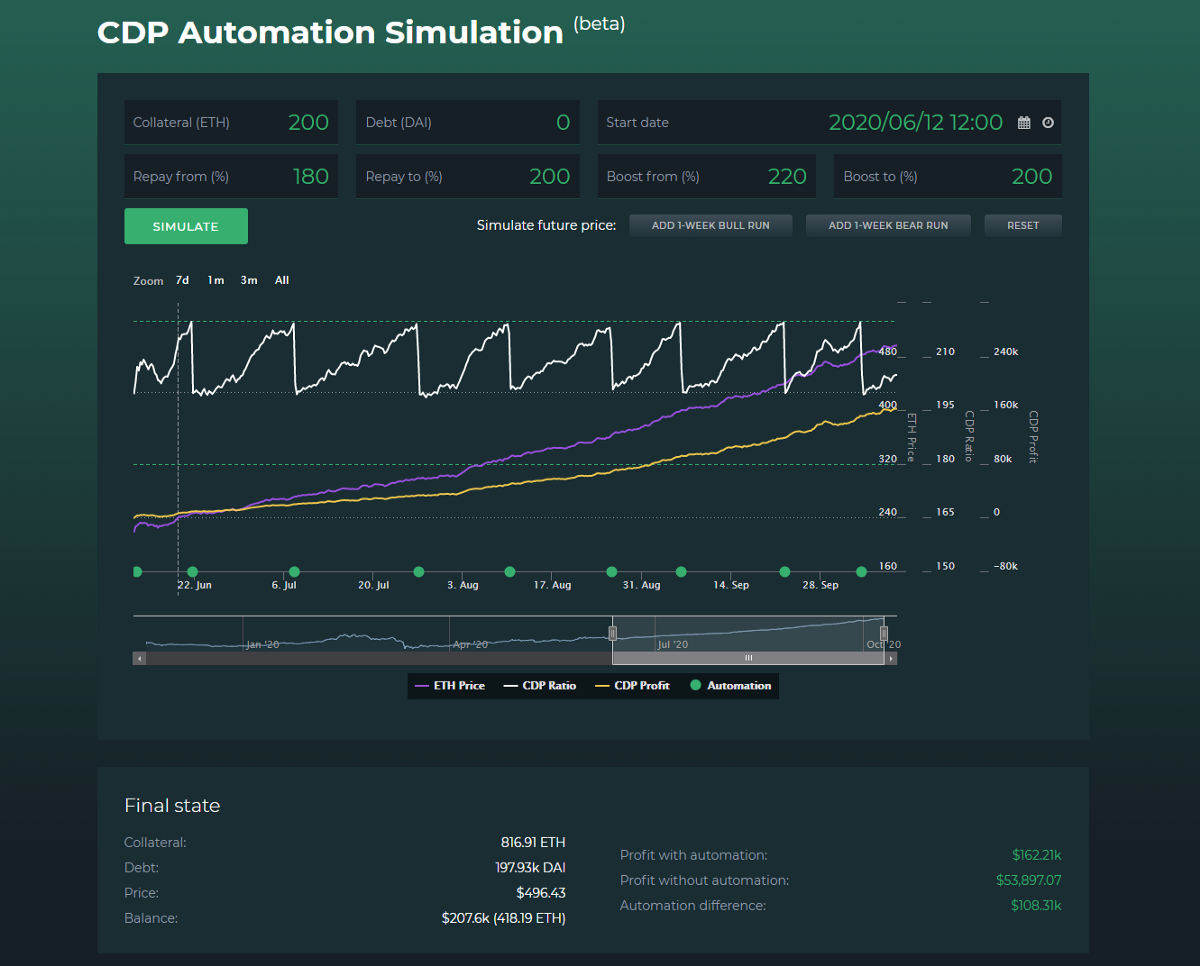
The gains are ~26% greater with the more aggressive settings. Why is that the case? Because this configuration will obtain ETH sooner than the previous, more relaxed one, meaning that ETH will be picked up at cheaper levels and consequently allow for quicker further leveraging as the market keeps moving up.
But just how far can this be pushed, how tight can we configure the thresholds to achieve maximum performance?
Let’s look at a 210% to 200% Auto-Boost simulation of the same market environment.
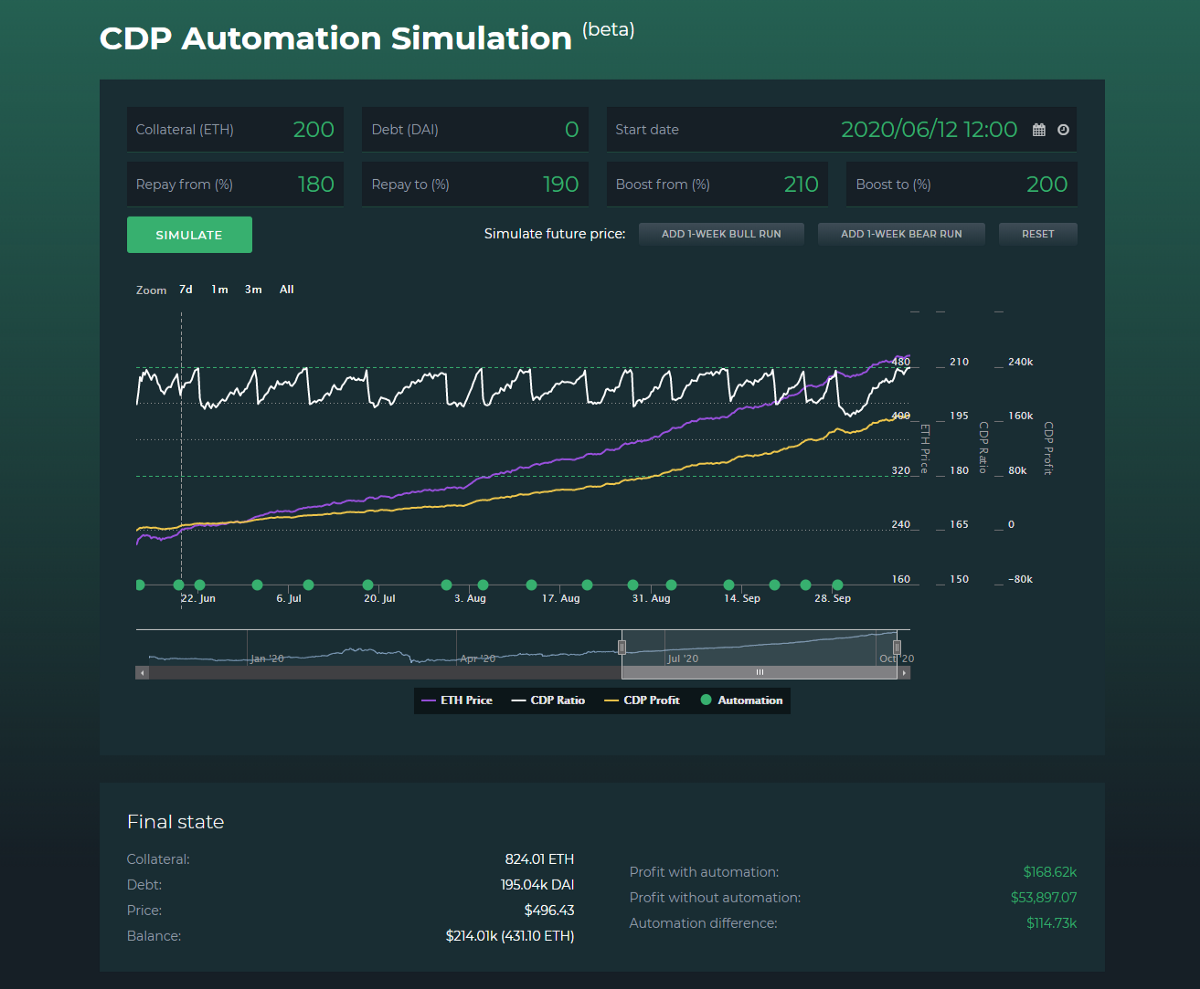
That’s a further increase of almost 10% ETH in the final balance. When does this effect stop, can we push this further?
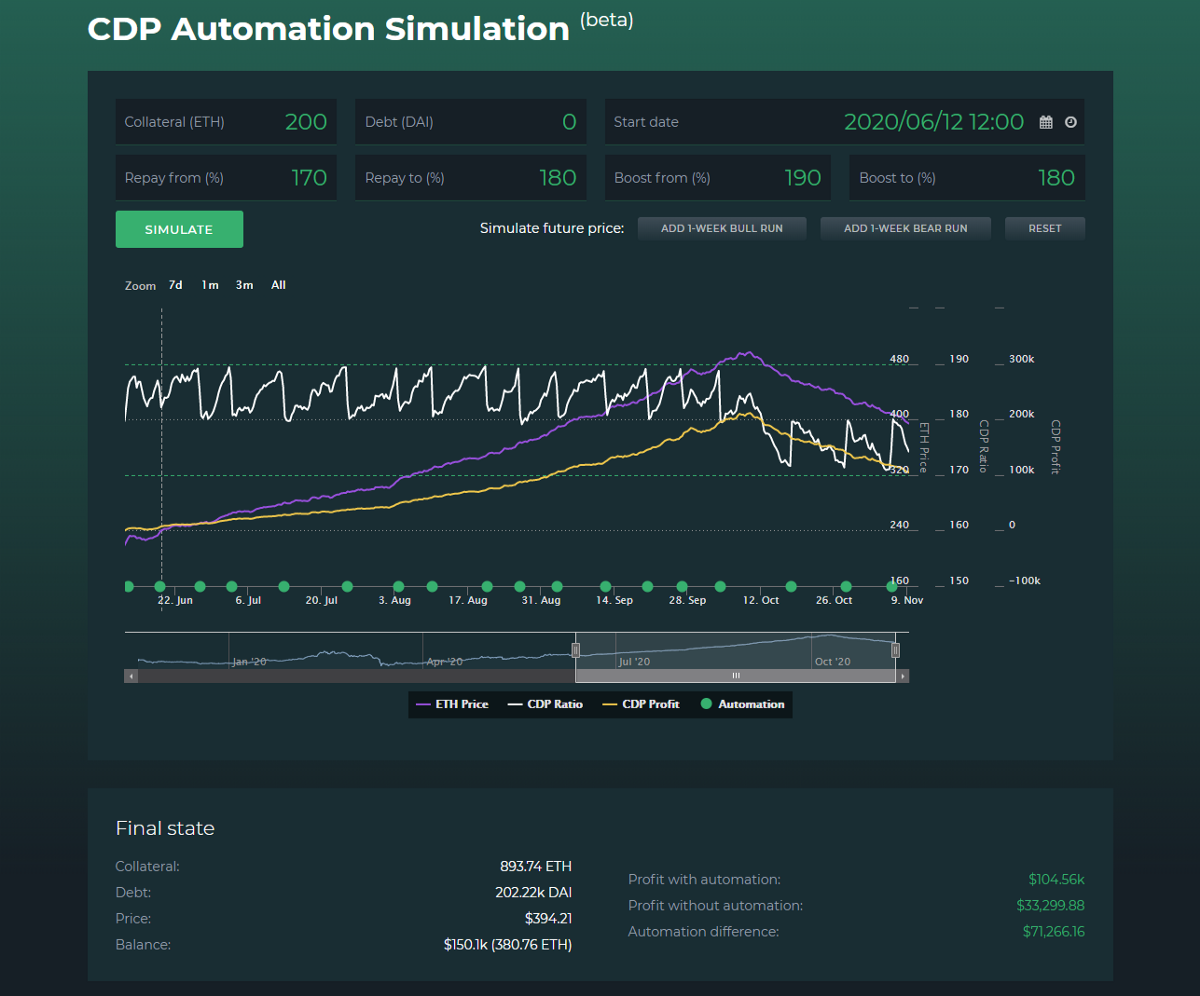
Making the settings even more aggressive, with Auto-Boost configured at 190%->180%, this is what we get:

That’s another very significant increase — a 37% increase from the previous tested setting or a 84% greater amount of ETH earned than what the first, default configuration (Boost from 240% to 220%) achieved.
We have to try and maximize this.
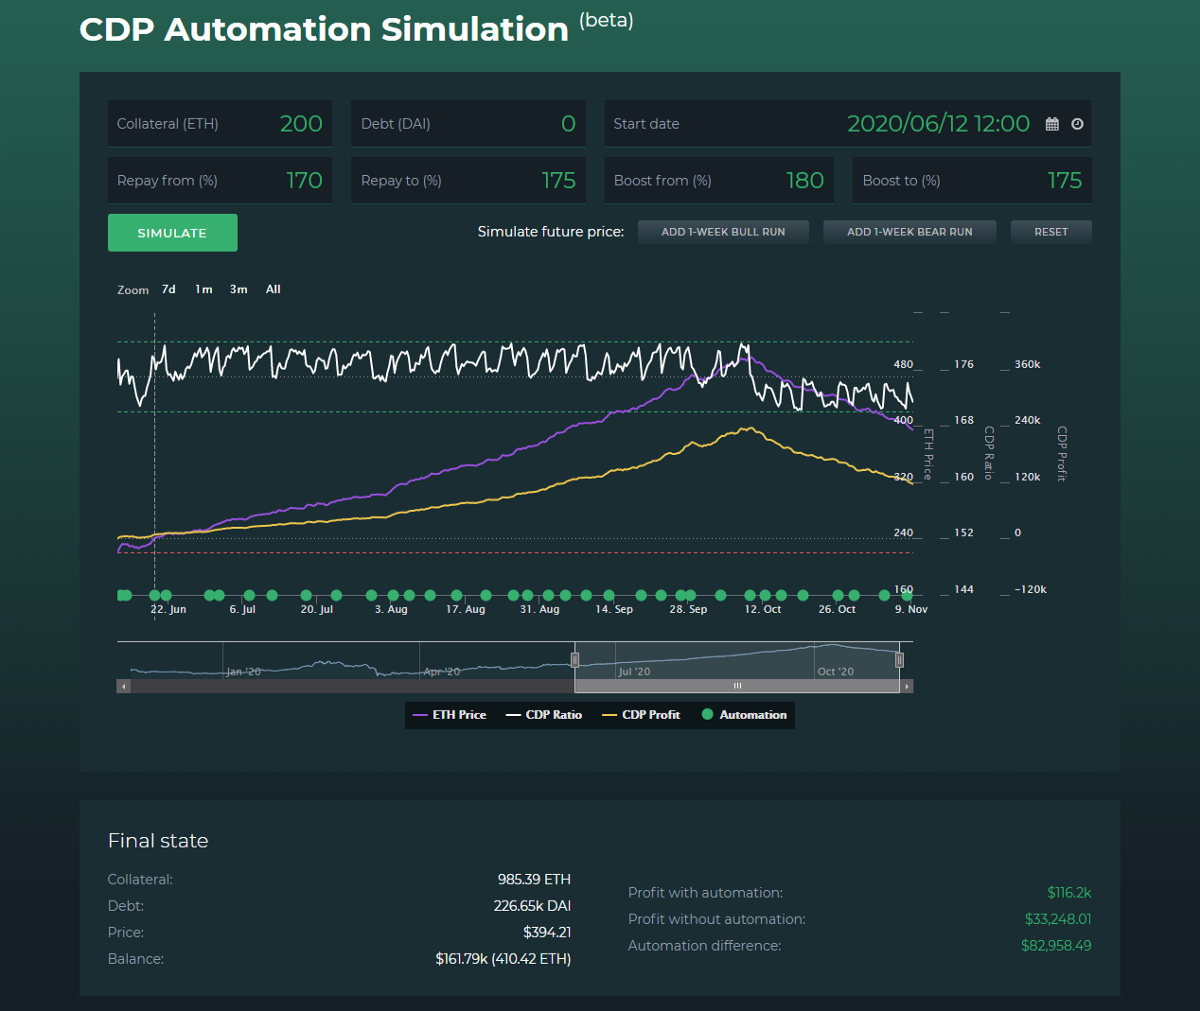
Next configuration will basically be the most aggressive possible: Boost from 180% to 175% (with Repay configured at 170% to 175% to accomodate for the extremely aggressive Boost).
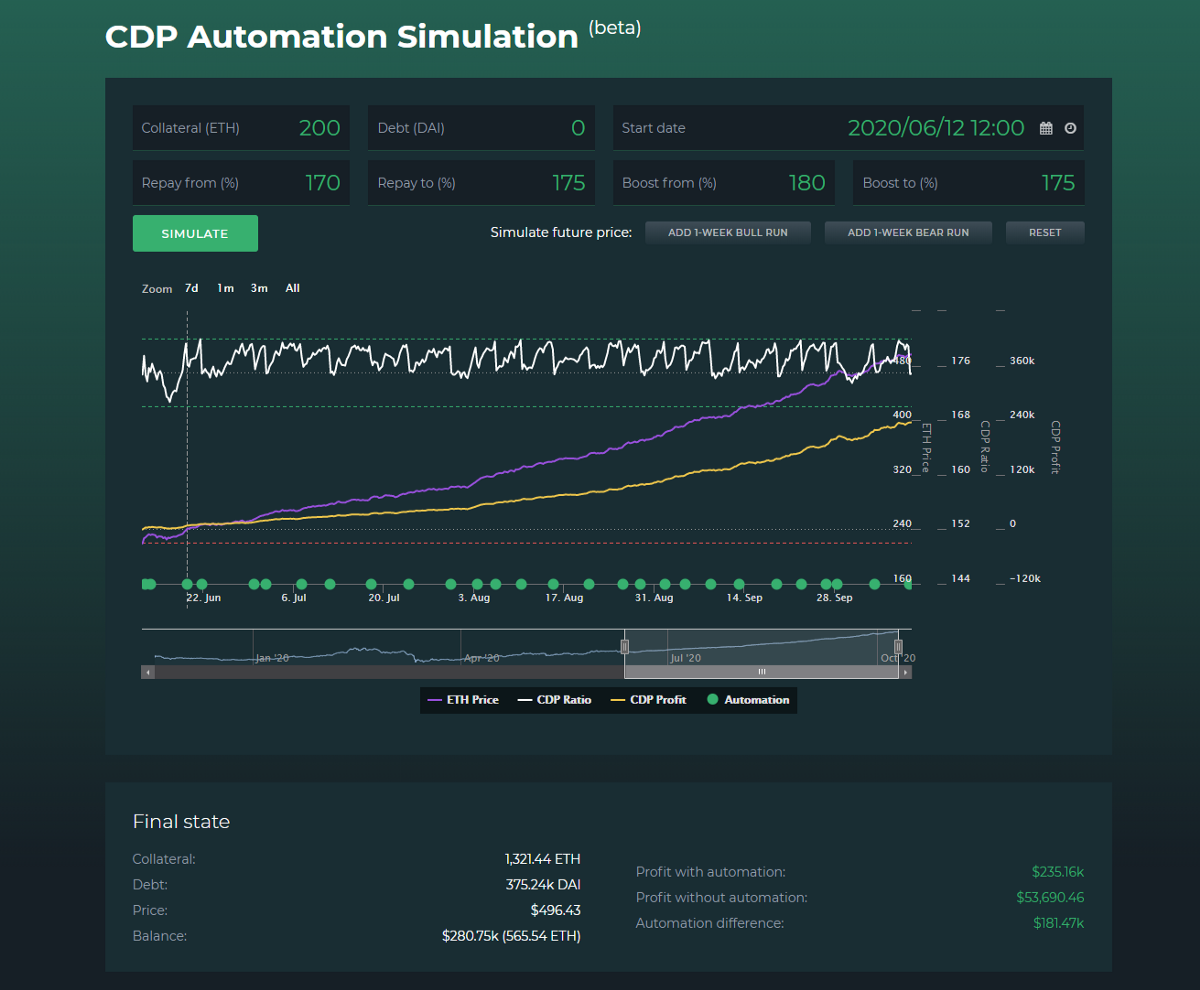
It turns out nothing can beat the concept of obtaining ETH sooner (and therefore cheaper) to allow for further leveraging quicker. The cascading effect is simply relentless and the results speak for themselves.
This configuration increases the amount of ETH earned thanks to Automation by a further 15% compared to the previous configuration, and by as much as +115% if compared to the default (240->220%) setting.
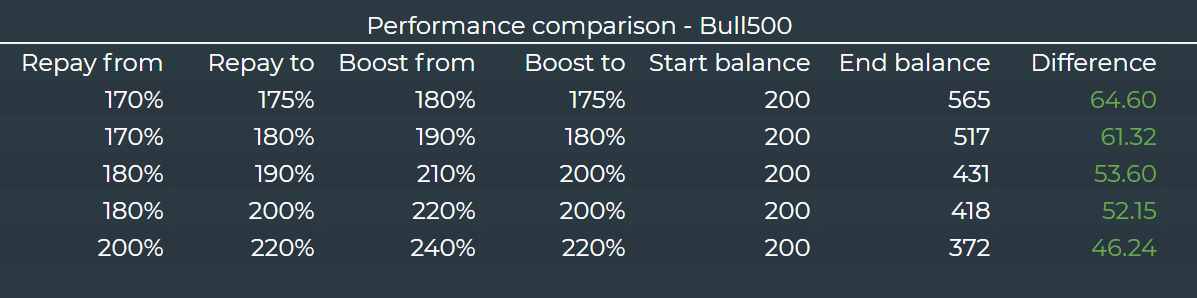
Here’s an overview of all tested configurations in this scenario.
While this sounds extremely promising, we have to be realistic and realize that this is a highly unlikely scenario.
Let’s consider and examine other potential developments, too.
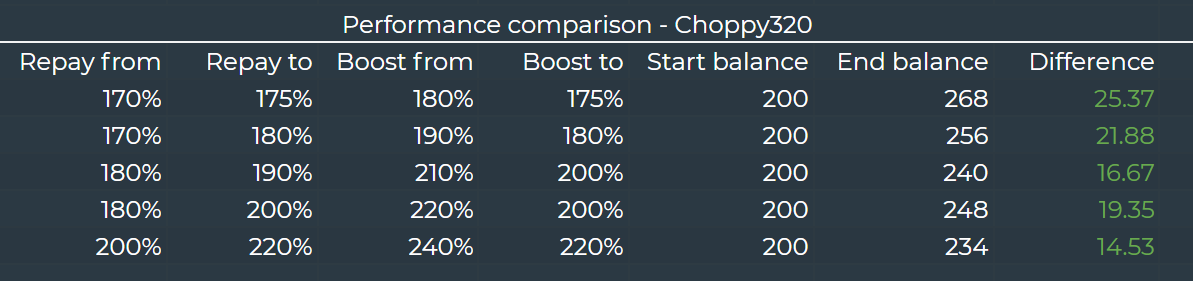
The choppy market case
A straight bull run would be the best case scenario, but it’s unfortunately somewhat unlikely to happen. Chances are there will always be periods of sideways action or even noticeable retraces ahead of us.
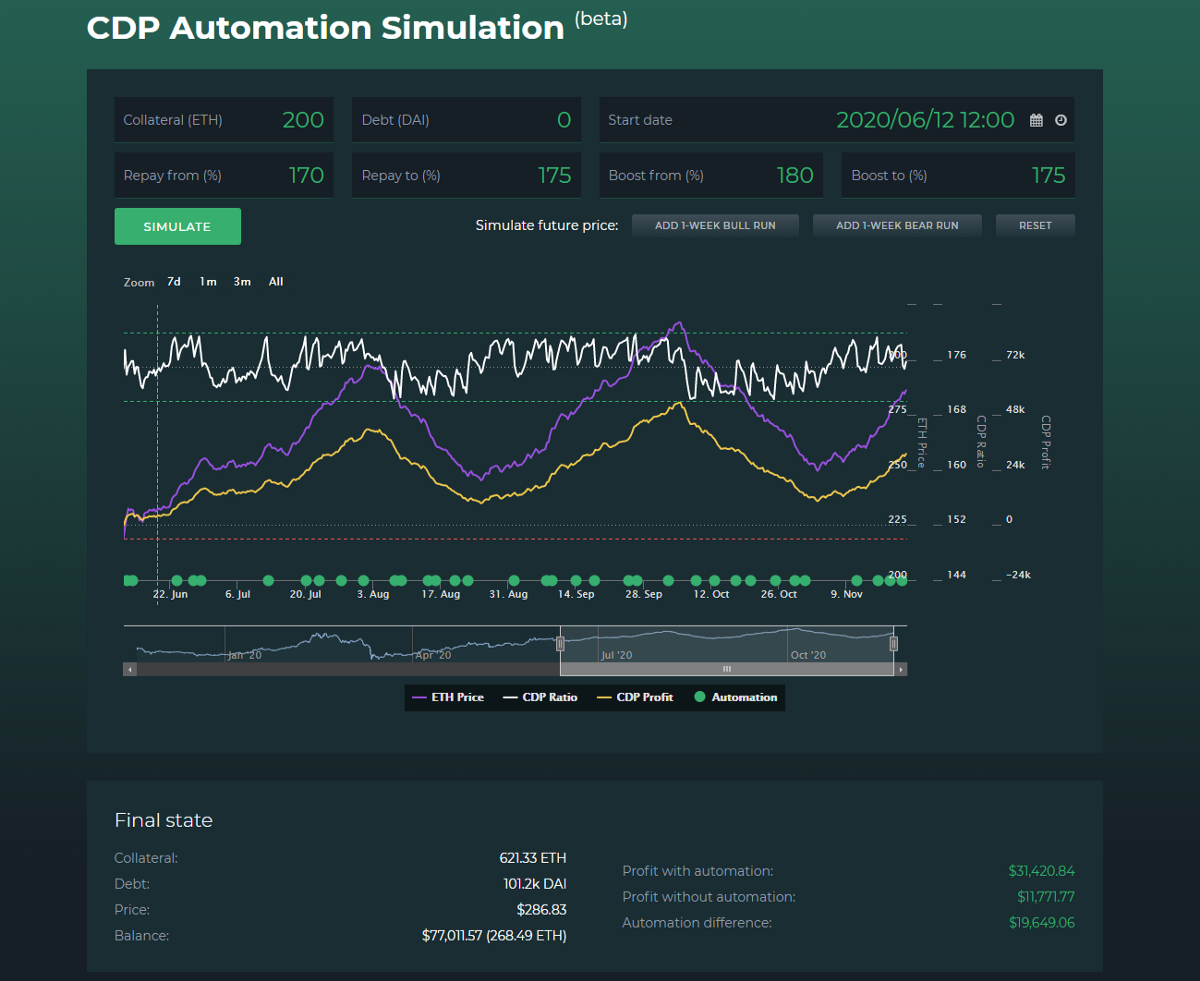
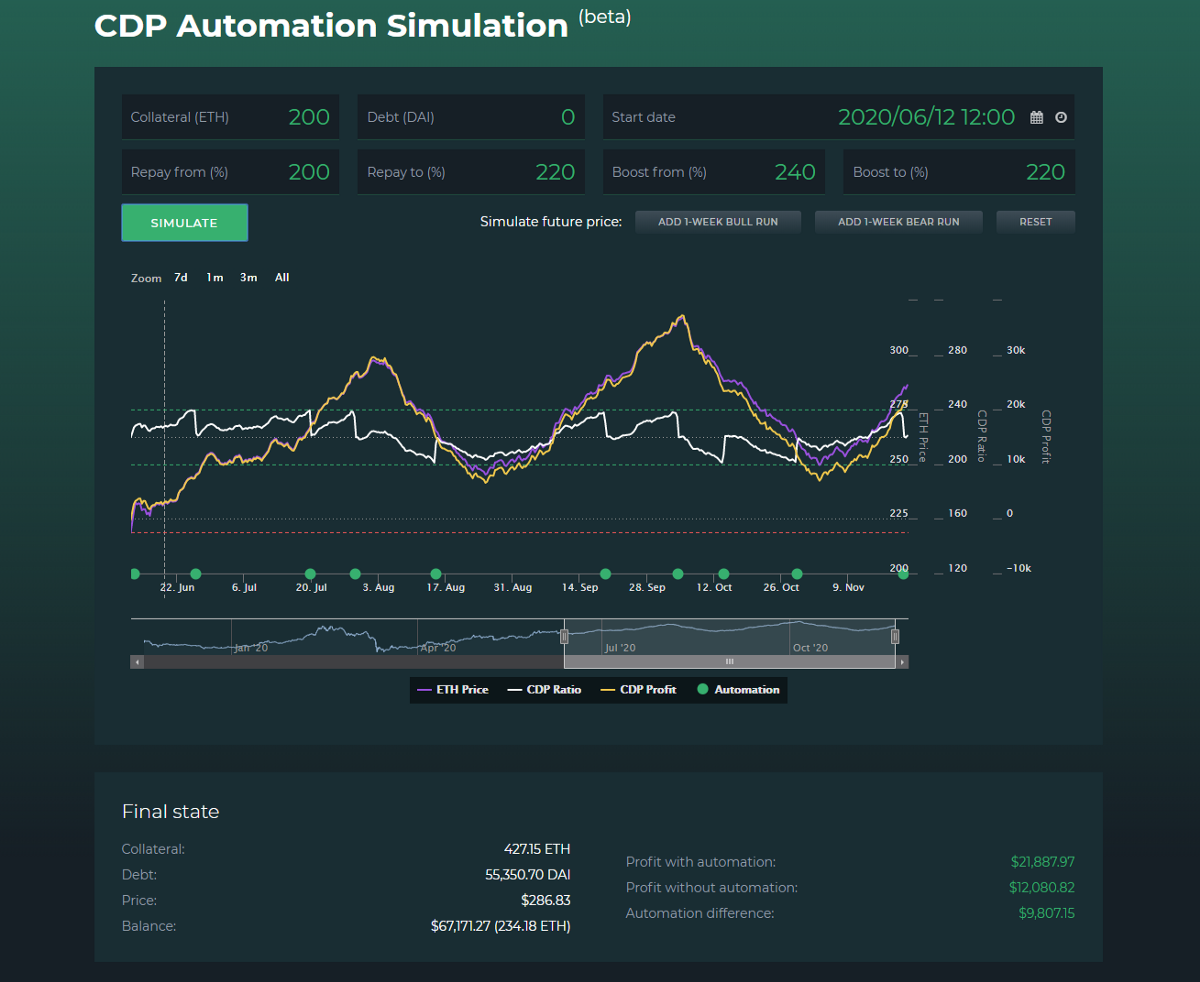
We’ve created a simulation of a market that’s moving up from the current ~$230 level, touching $300, falling back to $250, trying to break $320, diving down to $250 and then ending at $290. Overall, still a positive development, but will the same tight and aggressive configuration perform the best in this case?
It turns out that yes — it will. Though the differences between configurations are much smaller than in the previous case.
The Repay from 170% to 175% and Boost from 180% to 175% nets us the greatest profit, as seen below.
But the second best performing configuration, one that is only slightly less aggressive, in this scenario is really close.
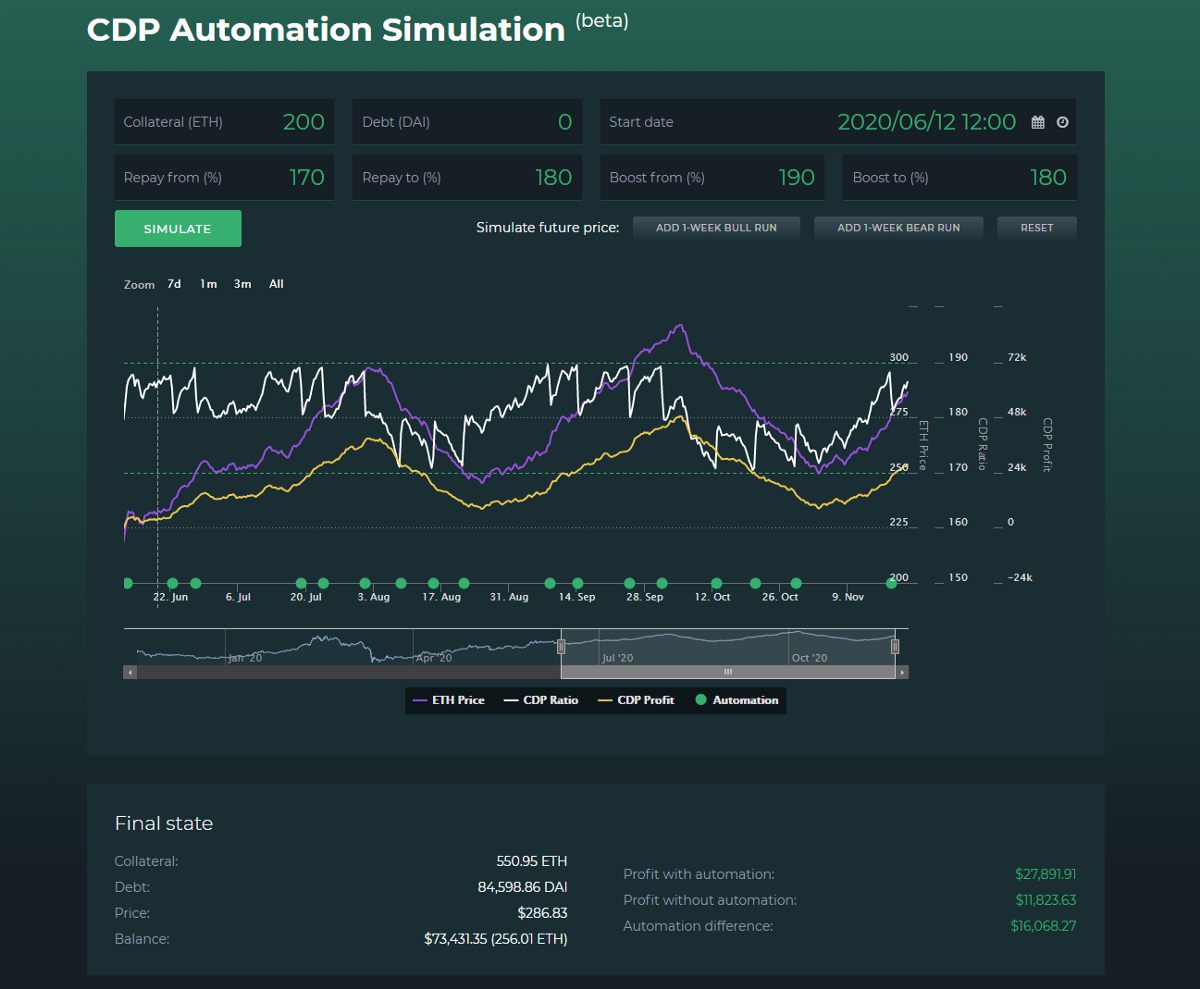
And even our recommended default configuration, although lowest performing of the five tested settings, still isn’t that far off:
This specific configuration was introduced as default after the events of Black Thursday and this is the configuration that would have kept every position safe against liquidation back then, since at that moment Automation couldn’t react to upcoming price updates in MakerDAO before they go live.
Although we’ve introduced much more robust Automation v2 since then, we have decided to keep this as the default configuration, compared to the previous one which had overall lower ratios (Repay from 180% to 200% and Boost from 220% to 200%). Ultimately, a higher ratio is inherently safer and one should ask themself if they would prefer a configuration promising a potentially slightly greater profit against one that’s providing a lot more safety against losses in case of a downfall. But we’ll talk more about risk later.
Here is an overview of all the tested configurations in this scenario, before we move on to the next one:
Retaining gains in a retrace
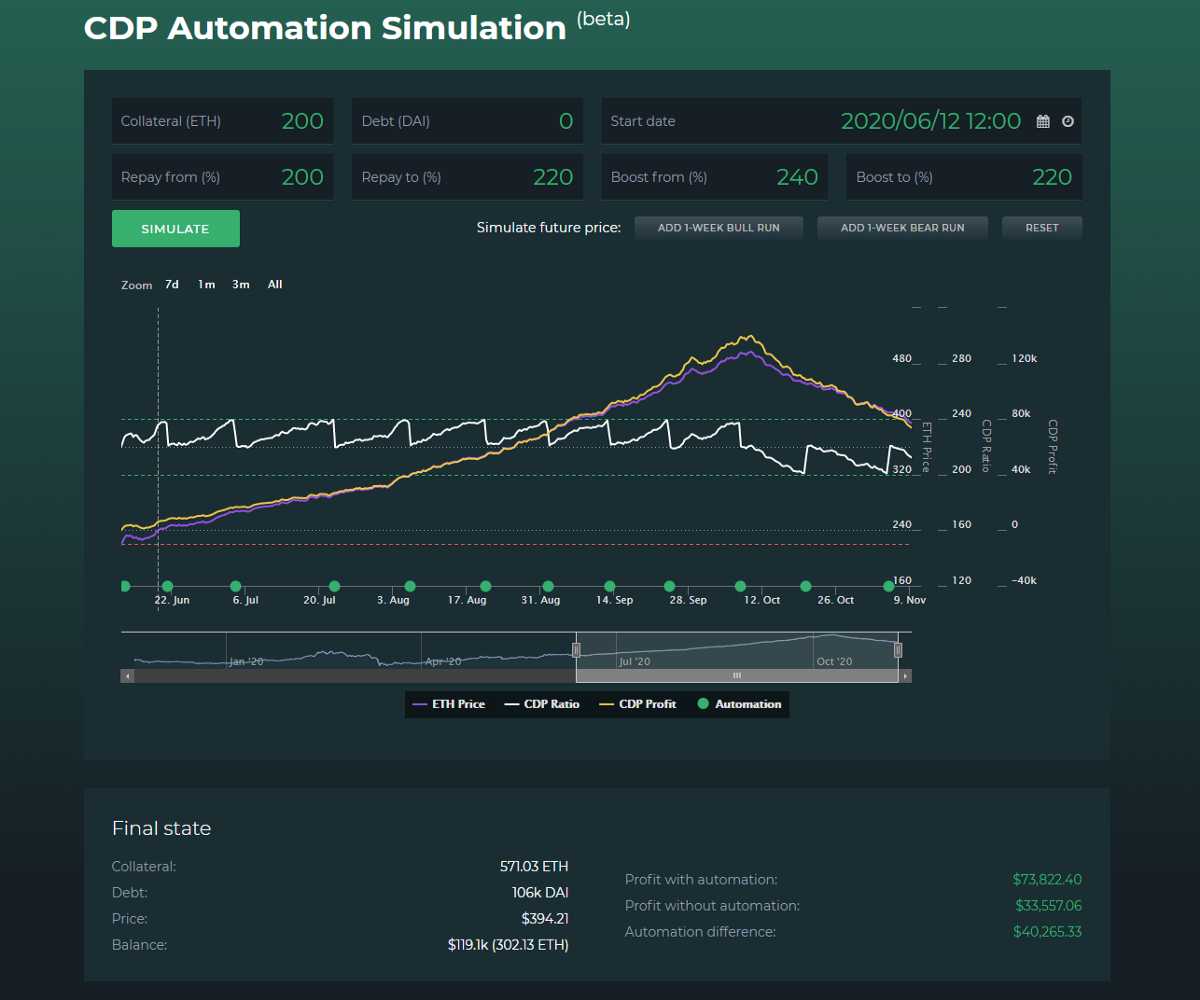
The next scenario we wanted to test is a case of a noticeable retrace. What if ETH were to go back down to $400 after reaching $500, which configuration would allow one to keep most of the gains made on the road to 500?
As it turns out, even in this case the most aggressive configuration takes the clear win.
And once again the second best performing setup is the one only slightly less aggressive.
Our recommended configuration is not the worst performer in this case, but it’s still far behind both of these.
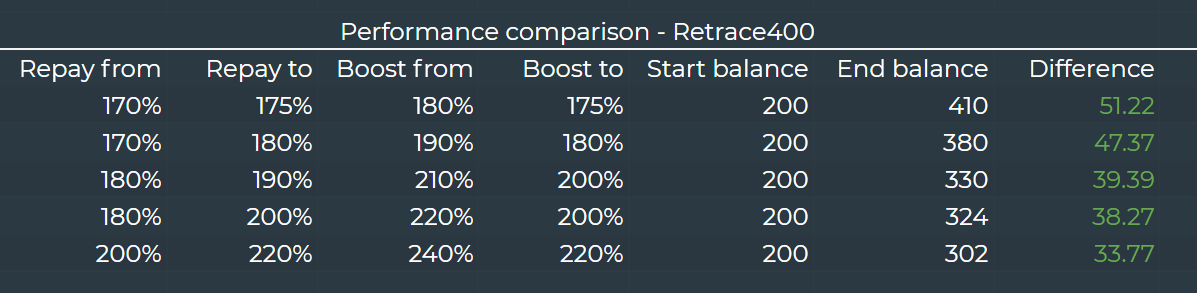
Overall, this is how all of the tested configurations compare in this case:
So far, all of the simulations were made with a positive outcome, one that we would all undoubtedly like to see. But we all also know that this doesn’t always happen.
How do these configurations perform in the real world?
These simple simulated market movements are one thing, but real market activity is most often a very different story. Do any of these settings make sense when tested over a period of actual recorded market activity?
As we currently only have access to historic price data since the launch of Multi-collateral Dai in the Simulation tool, we decided to experiment with two distinct periods — the full MCD lifetime and post Black Thursday era.
MakerDAO initially introduced Multi-collateral Dai on November 18, 2019 and for a few months since then things were looking great for Ether, all the way until the tremendous run up to $280 in February. Alas, we all know what happened soon afterwards. Though we’ve also been on a good recovery path since then.
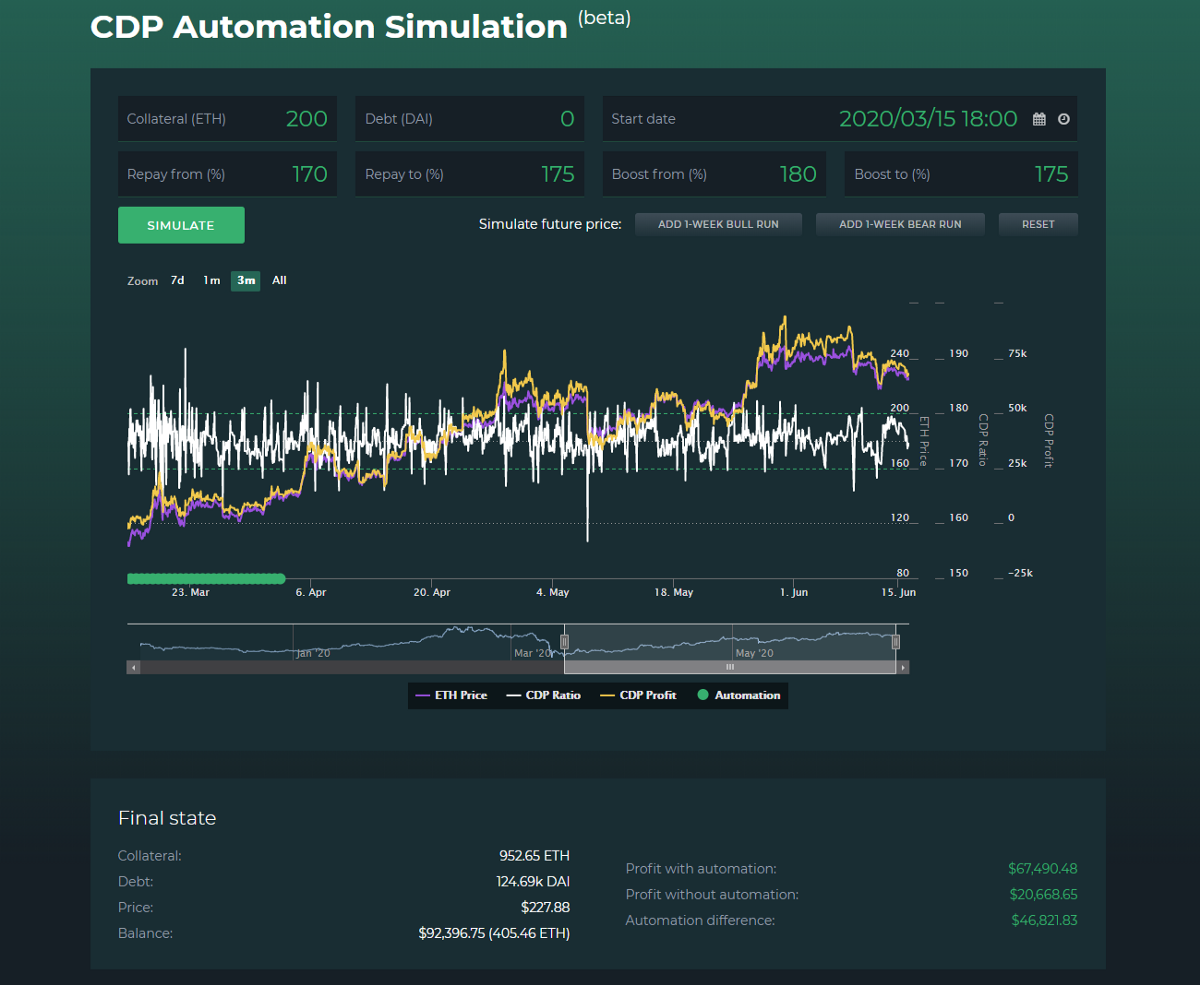
When applied to this 8 months period since November 18, our previously winning aggressive Automation configuration suffers immense losses.
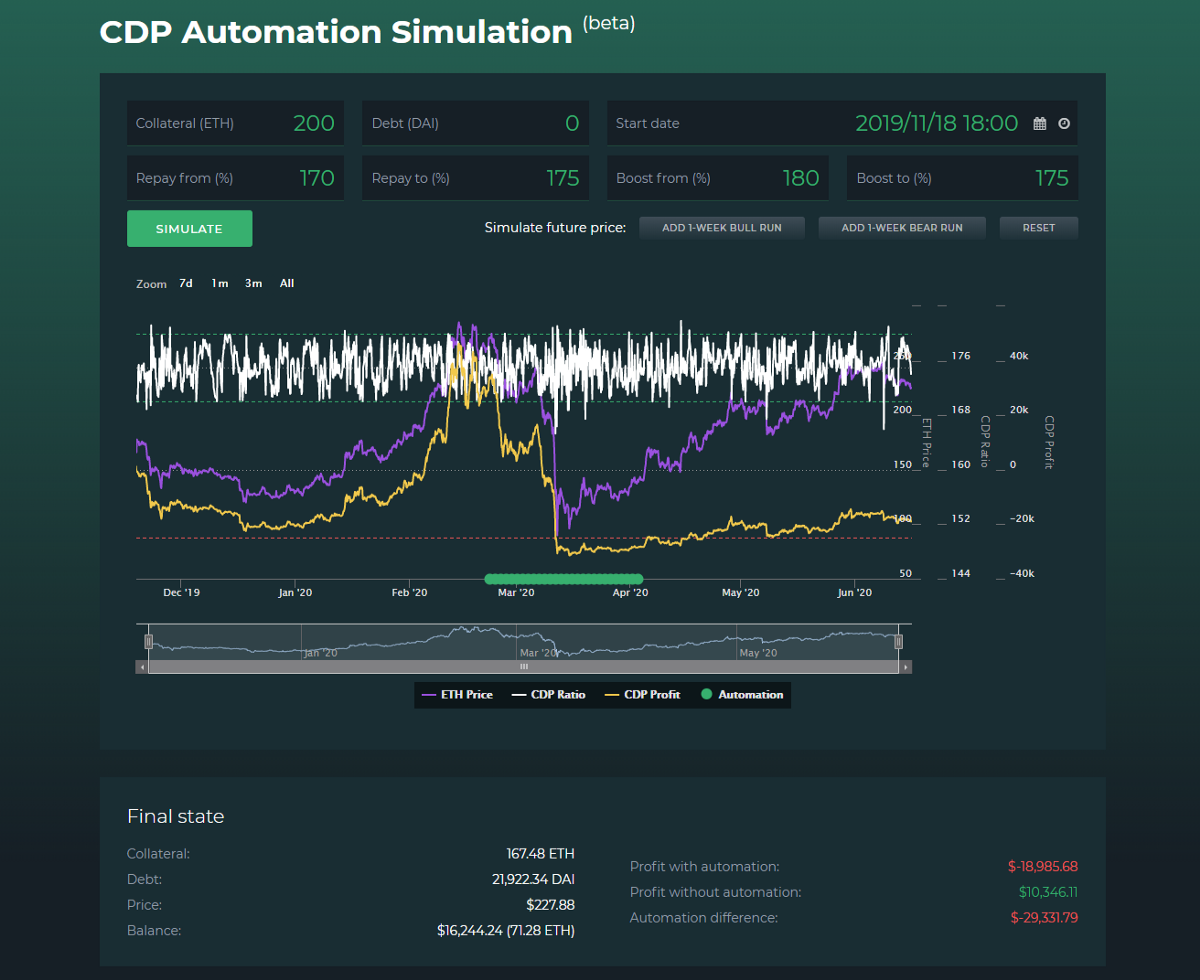
An initial starting point of 200 ETH on November 18 would now contain under 72 ETH if left automated over this whole period.
This case goes to show just how cruel a mistress leverage can be. And, unfortunately, many people have indeed suffered such (if not even greater) losses.
There is actually no Automation configuration that could have survived Black Thursday and led its owner to profit by this point. Or at least none that we could find — if you have, please do let us know.
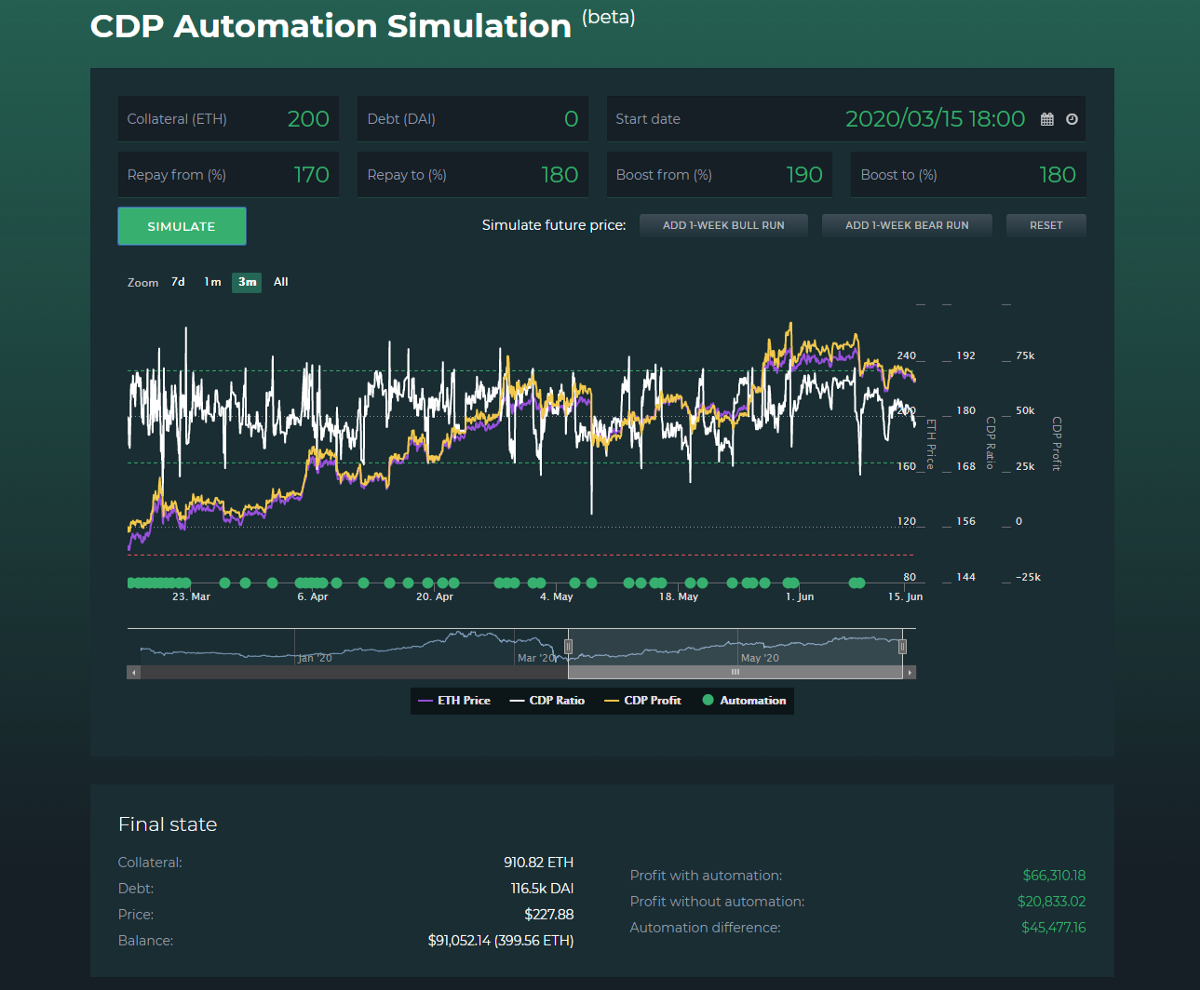
But things aren’t necessarily as bad as this with every configuration. Our current default configuration comes out with a much smaller loss and is actually the best performing of all the tested configurations. And not just those, we actually could not find a configuration that performed better at a more than marginal amount. Here are the exact stats:
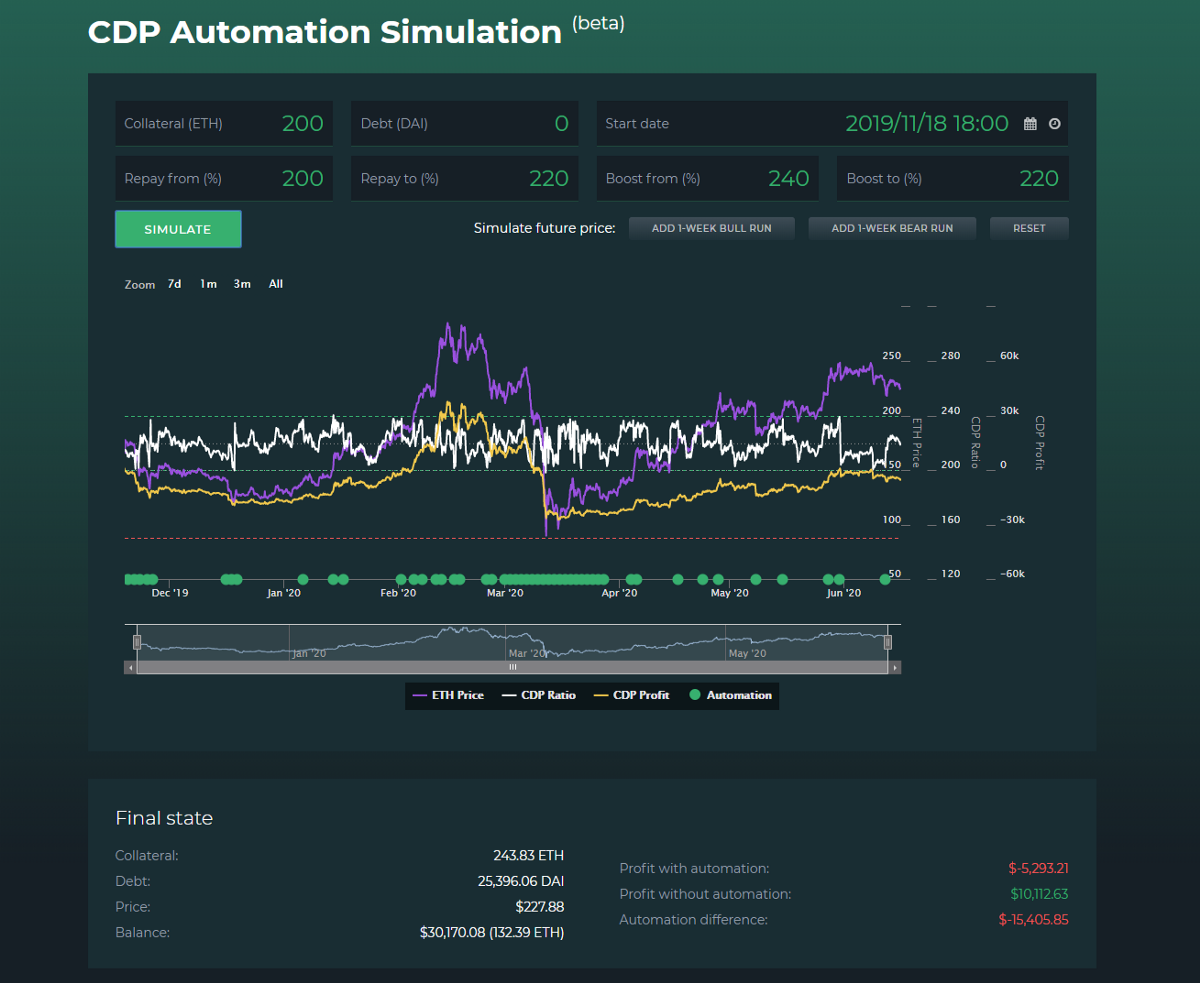
The loss is still great, but it’s much more manageable than with the aggressive setting.
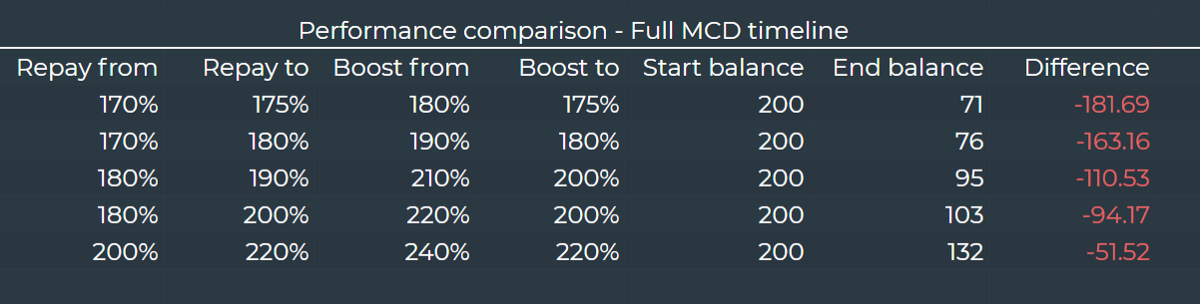
This is an overview of the performance of all the tested settings across the full MCD market history:
Moving on to tests with the post-Black Thursday period, we’ve set the start date at March 15 for all simulations. Although the atmosphere was still dreary from Black Thursday events, many quickly noticed that the recovery started basically right away. What if one made use of this?
In these simulations things completely change again and the most aggressive configuration possible takes the cake once more.
However, its lead compared to other configurations isn’t drastic, though it is definitely noticeable. If we take it a notch down, the change in results is very small:
But as we loosen the settings further, the profits do keep increasing. Here is our old default configuration:
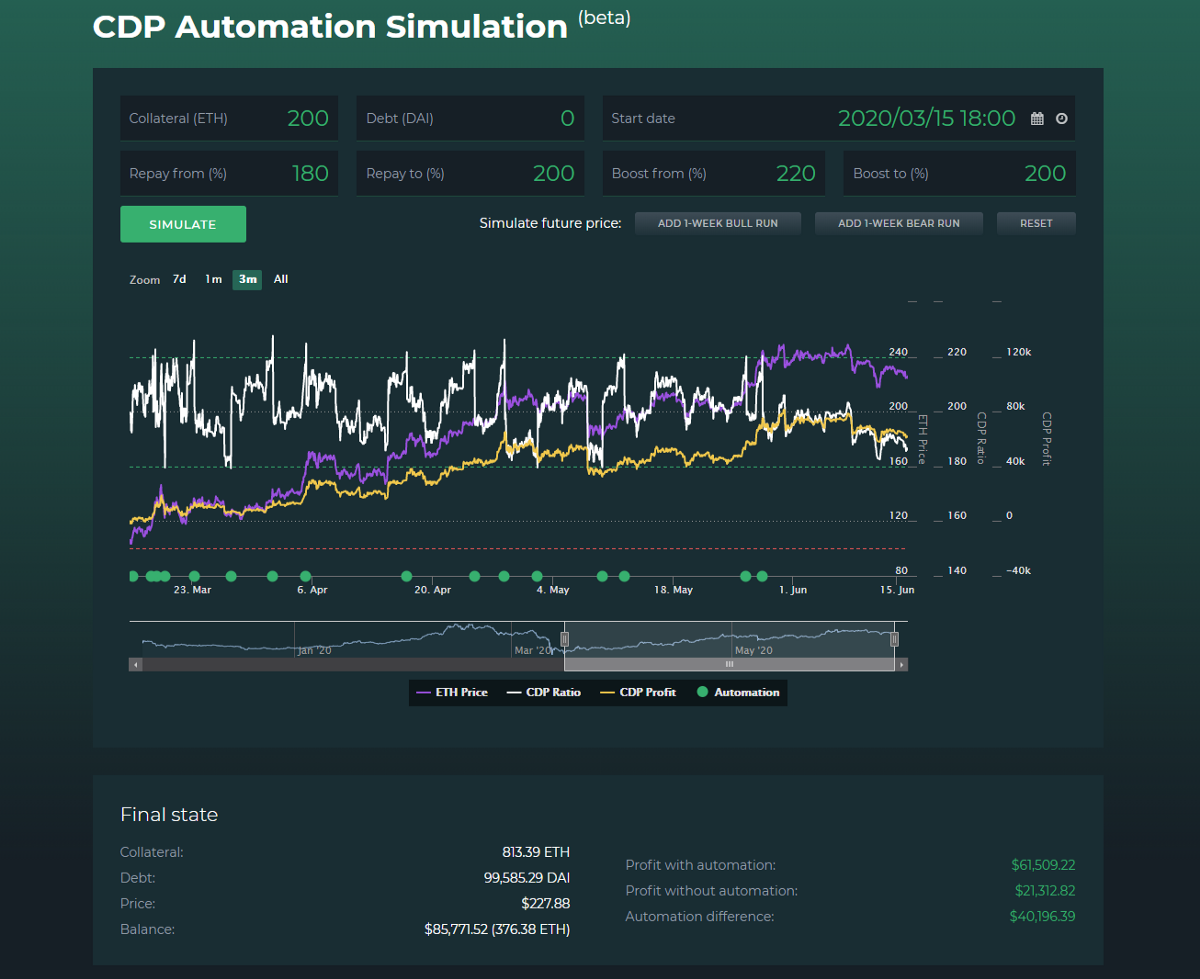
And our currently default one, too:
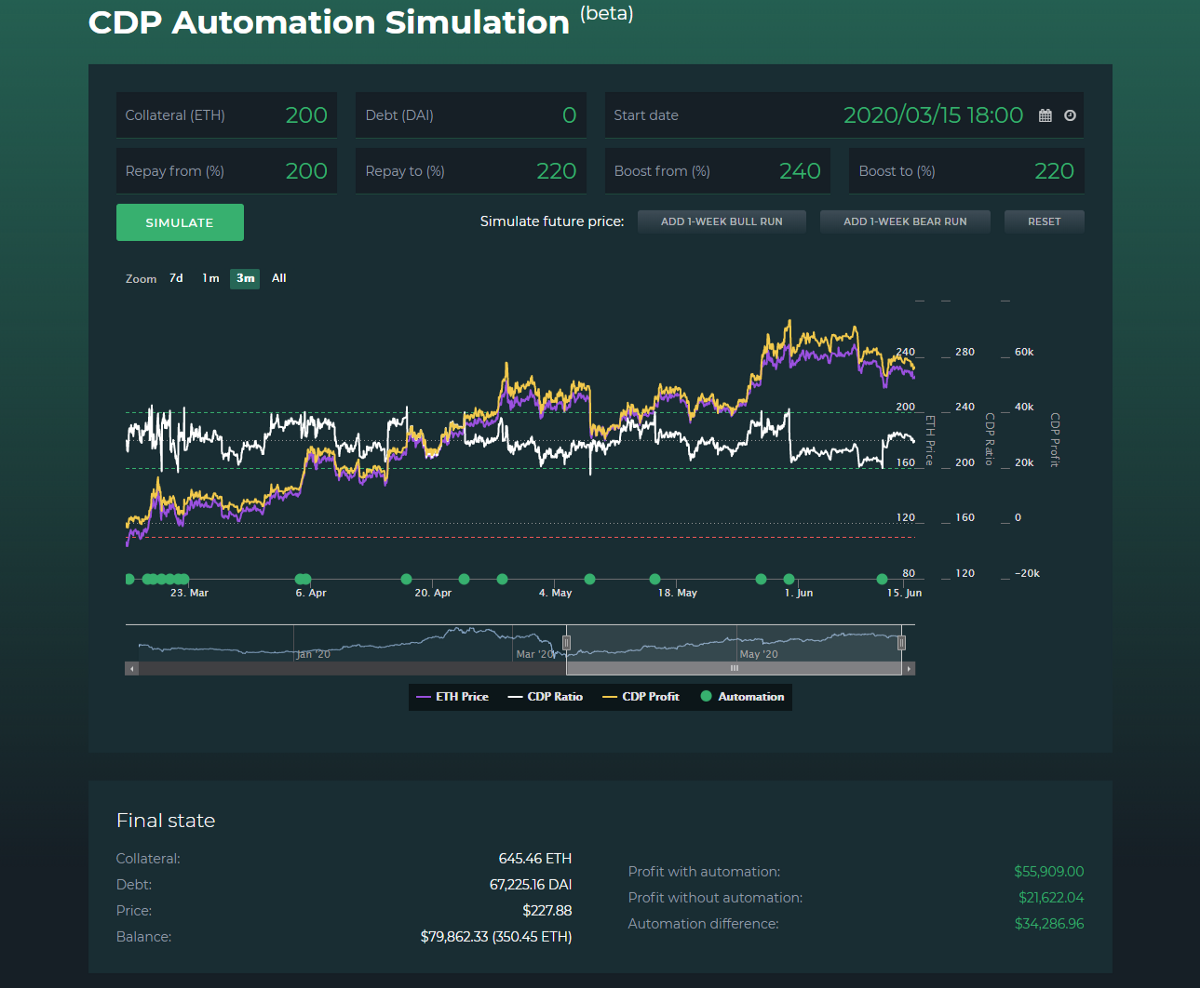
Overall, this is how the performance of different configurations looks when applied to this period:

Ultimately, it seems that a more aggressive configuration will result in higher profits as long as an Automated position is held over a period ending with a positive price movement compared to when the position was open.
That isn’t to say that we recommend everyone to go out and configure their Automation thresholds as aggressively as possible.
Considering the risk factors
Before anyone decides to create a CDP/Vault, sets up Automation and starts to prepare for retirement, there are certain risks everyone should be aware of.
Primarily, these are liquidation and smart contract risk.
Liquidation in MakerDAO happens when a position drops below the minimum collateral ratio set for that collateral type. In the case of ETH and WBTC that ratio is 150%. Once your position goes below that, it will be liquidated, which means that your full debt increased by a (minimum) 13% penalty will be paid off with the collateral locked inside, and you’ll be left with the remaining collateral to withdraw later on. We’ve talked about the MakerDAO liquidation process in our liquidation auctions GUI post.
While liquidation is a standard thing one should take into account when using leverage regardless of the platform used, there are issues that could happen to cause the liquidations in MakerDAO to be far more severe than expected. One example were the controversial 0-bids during Black Thursday which resulted in liquidated positions to be 100% liquidated for their owners. This is something we covered briefly in our Black Thursday post.
Black Thursday specifically is a great example of just how complicated things can get during extreme events. Delayed price oracle updates, delayed liquidation bites, Keepers failing to participate in collateral auctions — there was a lot happening on that day.
On top of all of that, one should also consider the possibility of smart contract issues. Even though neither MakerDAO nor DeFi Saver Automation have a history of technical or security issues, the whole decentralized finance ecosystem is still extremely young.
Anyone participating in decentralized finance should do their own research and understand the potential risks.
Disclaimer and closing thoughts
This experiment and analysis were in no way done in a scientific manner and this post should not be considered financial advice in any capacity. We can in no way guarantee any financial gains from using DeFi Saver in any market conditions.
The tests were conducted with the available data and the Simulation tool in its current state and with its current limitations. We would love to hear your thoughts on how we can improve both the Simulation tool and the overall analysis which we will very likely re-do in a few months.
Additionally, in its current iteration, the Automation system is fairly limited, even crude if you will. For now it allows automatic leverage increase when collateral goes up and automatic unwinding when it goes down. But it can still allow users to achieve very desirable results, as shown earlier in this post.
Over the next months we plan to introduce Automation updates that would add more options to reduce the need for user input or even allow for a full hands-off approach. These would include the option to close one’s CDP at target prices, be it as a stop loss or a take profit function, the option to stop boosting at a certain point or to only boost if a certain signal is actualized and more.
We also plan to introduce signals support in Automation, allowing a configuration that would Boost only when a certain signal is confirmed, for example “Boost from 220% to 200% when EMA20 is crossed”. It will be very interesting to test how Automation would perform with different signals used and we definitely intend to add those options to the Simulation tool, too.
If you have any feedback, suggestions or questions regarding Automation, please don’t hesitate to reach out to us and share it, via Twitter, Discord or Reddit.
Talk soon!😉
Stay connected:
🌍: DeFiSaver.com
💬: Official Discord
📢: Official Twitter